


Sciatica, that sharp, shooting pain radiating from your lower back down your leg, can be debilitating. It disrupts work, sleep, and daily activities for many of us here in San Jose. While it may feel like a constant burden, lasting relief is not only possible but well within your reach. The key is combining the right targeted exercises with expert care from a local chiropractor who can address the root cause of the nerve irritation.
As your dedicated San Jose sciatica chiropractor, we understand the profound impact this condition has on your quality of life. At Resolve Chiropractic, we’ve seen firsthand how specific, gentle movements can significantly reduce pain and restore function when properly applied. This guide provides an actionable list of the best exercises for sciatica relief, carefully selected to help you manage symptoms at home. These exercises are designed to complement professional chiropractic care, empowering you to take an active role in your recovery from back pain and nerve pain.
This is more than just a list; it’s a strategic plan to help our San Jose community find relief. You will learn precise, step-by-step instructions for each movement, including proper form, frequency, and modifications to ensure safety and effectiveness. We’ll cover everything from gentle stretches like the Pigeon Pose to core stabilization movements like the Bird Dog. Whether you’re dealing with a new flare-up or have been struggling with chronic discomfort, these exercises are a vital first step toward reclaiming your mobility and well-being.
1. Pigeon Pose (Eka Kapotasana)
Pigeon Pose is a highly effective hip-opening stretch renowned for its ability to relieve sciatic nerve pain. This pose specifically targets the piriformis muscle, a small but powerful muscle located deep in the buttock. When the piriformis becomes tight or inflamed—a common issue for those of us in San Jose who sit for long periods—it can compress the sciatic nerve running beneath it, leading to radiating pain. This makes Pigeon Pose one of the best exercises for sciatica relief available.
The effectiveness of this stretch lies in its ability to externally rotate the femur in the hip socket while stretching the deep gluteal muscles. This action directly lengthens and releases tension in the piriformis, creating more space for the sciatic nerve and reducing irritation. Many of our patients at Resolve Chiropractic in San Jose, from desk workers to athletes, find significant relief by incorporating this stretch into their home care routines after a chiropractic adjustment.
How to Perform Pigeon Pose
Follow these steps carefully to ensure proper form and maximize the benefits of this key exercise for sciatica relief:
- Starting Position: Begin on all fours in a tabletop position. Your wrists should be under your shoulders and your knees under your hips.
- Position the Front Leg: Gently slide your right knee forward toward your right wrist. Angle your right shin so your right foot is near your left wrist. The more parallel your shin is to the front of your mat, the deeper the stretch will be.
- Extend the Back Leg: Slide your left leg straight back, keeping your kneecap and the top of your foot on the floor.
- Square Your Hips: Look back to ensure your left leg is extended straight behind you. Lower both hips toward the floor, keeping them level. If there is a gap under your right hip, place a folded blanket or yoga block there for support.
- Fold Forward: Inhale to lengthen your spine, and as you exhale, walk your hands forward and lower your upper body down over your front leg. You can rest on your forearms or stack your hands to rest your forehead on them.
- Hold and Breathe: Hold the pose for 30-60 seconds, breathing deeply into any areas of tension. You should feel a deep stretch in your right glute and hip, not sharp pain. Carefully come out of the pose and repeat on the left side.
Pro-Tip: Perform Pigeon Pose 10-15 minutes after your chiropractic adjustment here at our San Jose clinic. Your joints will have better mobility, allowing the muscles to release more effectively and helping to stabilize your spinal alignment.
Modifications and Precautions
- Pregnancy-Safe Modification: For our prenatal chiropractic patients, perform a seated version (Figure-Four Stretch) by sitting on a chair, crossing one ankle over the opposite knee, and gently leaning forward until you feel a stretch.
- For Tight Hips: Always use a yoga block or firm cushion under the hip of the bent leg to keep your pelvis level and prevent strain on the knee or lower back.
- Contraindications: Avoid this pose if you have a significant knee injury, sacroiliac (SI) joint issues, or an acute hip injury. If you feel any sharp, shooting, or pinching pain, immediately and gently come out of the stretch.
2. Sciatic Nerve Flossing (Neural Mobilization)
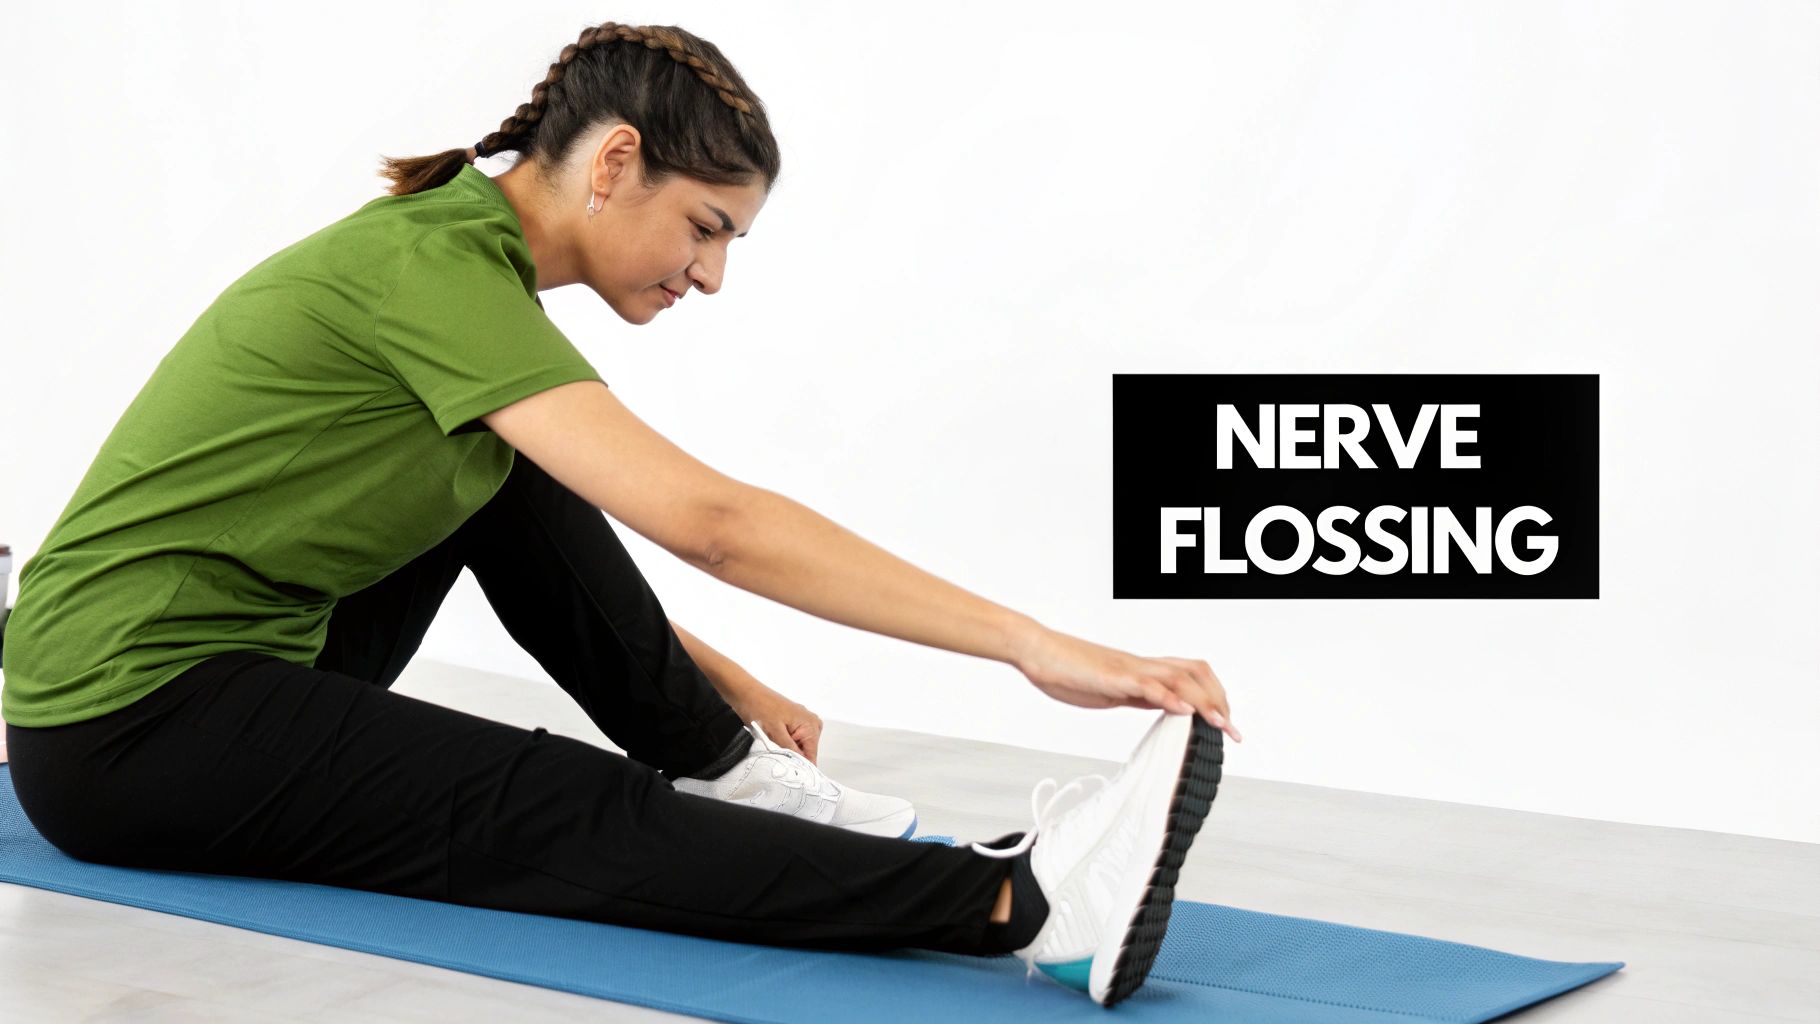
Sciatic nerve flossing, also known as neural mobilization, is a specialized dynamic technique designed to gently move the sciatic nerve along its path. Unlike static stretches that hold a position, nerve flossing involves controlled, repetitive movements. This “flossing” action helps reduce nerve adhesions or “stickiness,” improves neural mobility, and can alleviate the irritation that causes sciatic pain. This makes it one of the most direct and best exercises for sciatica relief.
The value of this technique lies in its focus on the nerve itself, rather than just the surrounding muscles. When the sciatic nerve becomes entrapped or compressed by tight muscles, scar tissue, or a disc injury, it loses its ability to glide freely. Nerve flossing encourages this gliding motion, helping to improve circulation to the nerve and reduce inflammation and pain signals. Patients at Resolve Chiropractic in San Jose, especially those recovering from a disc injury or auto injury, find this gentle mobilization crucial for long-term relief.
How to Perform Sciatic Nerve Flossing
Follow these steps carefully. The goal is gentle movement, not an intense stretch. It is highly recommended to learn this from a professional first.
- Starting Position: Lie on your back with both knees bent and your feet flat on the floor. Keep your head and shoulders relaxed on the ground.
- Grasp the Leg: Gently bring your right knee toward your chest and hold the back of your thigh with both hands.
- Extend and Flex: While holding your thigh, slowly straighten your right leg toward the ceiling until you feel a light, gentle stretch in the back of your leg.
- Point and Flex the Foot: Once your leg is extended, gently point and flex your ankle 5-10 times. Point your toes toward the ceiling (plantar flexion), then flex your foot by pulling your toes back toward you (dorsiflexion). This is the “flossing” motion.
- Lower and Repeat: Bend your knee and slowly lower your leg back to the starting position. Perform 5-10 repetitions, then switch and repeat on the left side.
Pro-Tip: Combine nerve flossing with deep, diaphragmatic breathing. Inhale as you relax the foot and exhale as you flex your ankle back toward you. This can help relax the nervous system and enhance the mobilizing effect of the exercise.
Modifications and Precautions
- Pregnancy-Safe Modification: Perform this exercise while seated in a sturdy chair. Sit tall, then extend one leg straight out and perform the same ankle pointing and flexing motion. This reduces pressure on the abdomen and back.
- For Acute Pain: Start with a very small range of motion. Only straighten your leg to the point of mild tension, not pain.
- Contraindications: If you experience a sharp increase in pain, tingling, or numbness that travels down your leg, stop immediately. This technique may not be suitable for certain acute disc herniations. It is essential to get a proper diagnosis from a professional chiropractor in San Jose before beginning. You can learn more about how we diagnose and treat nerve pain and neuralgia at our clinic.
3. Prone Hip Internal Rotation Stretch
The Prone Hip Internal Rotation Stretch is a floor-based exercise that effectively targets the deep internal hip rotator muscles, including the piriformis. This stretch is particularly valuable because it isolates and gently lengthens the muscles that can compress the sciatic nerve. For many individuals, this position offers a more accessible and gentler alternative to Pigeon Pose while delivering similar, powerful sciatic pain relief benefits.
This stretch works by placing the femur in a position of deep internal rotation, which creates a specific release of tension in the piriformis and surrounding gluteal muscles. By alleviating this muscular pressure, the stretch helps to decompress the sciatic nerve, reducing pain and tingling. At Resolve Chiropractic in San Jose, we often recommend this as one of the best exercises for sciatica relief, especially for patients who find other hip-opening poses too intense.
How to Perform the Prone Hip Internal Rotation Stretch
Follow these steps carefully to perform this sciatica relief exercise safely and effectively:
- Starting Position: Begin by lying face down on a comfortable, flat surface, such as a carpeted floor or yoga mat. You can rest your forehead on your stacked hands.
- Position the Affected Leg: Gently bend the knee of your affected leg to a 90-degree angle.
- Initiate the Stretch: Keeping your hips flat against the floor, slowly let your bent leg fall inward across the midline of your body. Your foot will move toward the opposite side.
- Deepen the Stretch: Allow gravity to gently pull the leg down, deepening the stretch in your glute and deep hip area. Only go as far as you feel a comfortable stretch, not sharp pain.
- Hold and Breathe: Hold the position for 45-90 seconds while breathing deeply. Focus on relaxing the muscles in your hip and glute with each exhale.
- Release and Repeat: Slowly bring your leg back to the starting position. Repeat on the other side, even if you only have symptoms on one side, to maintain muscular balance.
Pro-Tip: Perform this stretch before bed to help reduce nighttime sciatica discomfort. The gentle release of hip tension can prevent the nerve from becoming irritated while you sleep, leading to a more restful night.
Modifications and Precautions
- For Added Comfort: If you feel pressure in your lower back or hip bones, place a small, flat pillow or a folded towel under your hips for cushioning and to maintain a neutral pelvic position.
- For Knee Sensitivity: Individuals with knee arthritis or sensitivity often find this stretch more comfortable than Pigeon Pose because it places less torque on the knee joint.
- Contraindications: Avoid this stretch if it causes sharp, shooting pain in your hip, knee, or back. If you have had a recent hip replacement or are dealing with an acute sacroiliac (SI) joint injury, consult with your chiropractor before attempting this exercise.
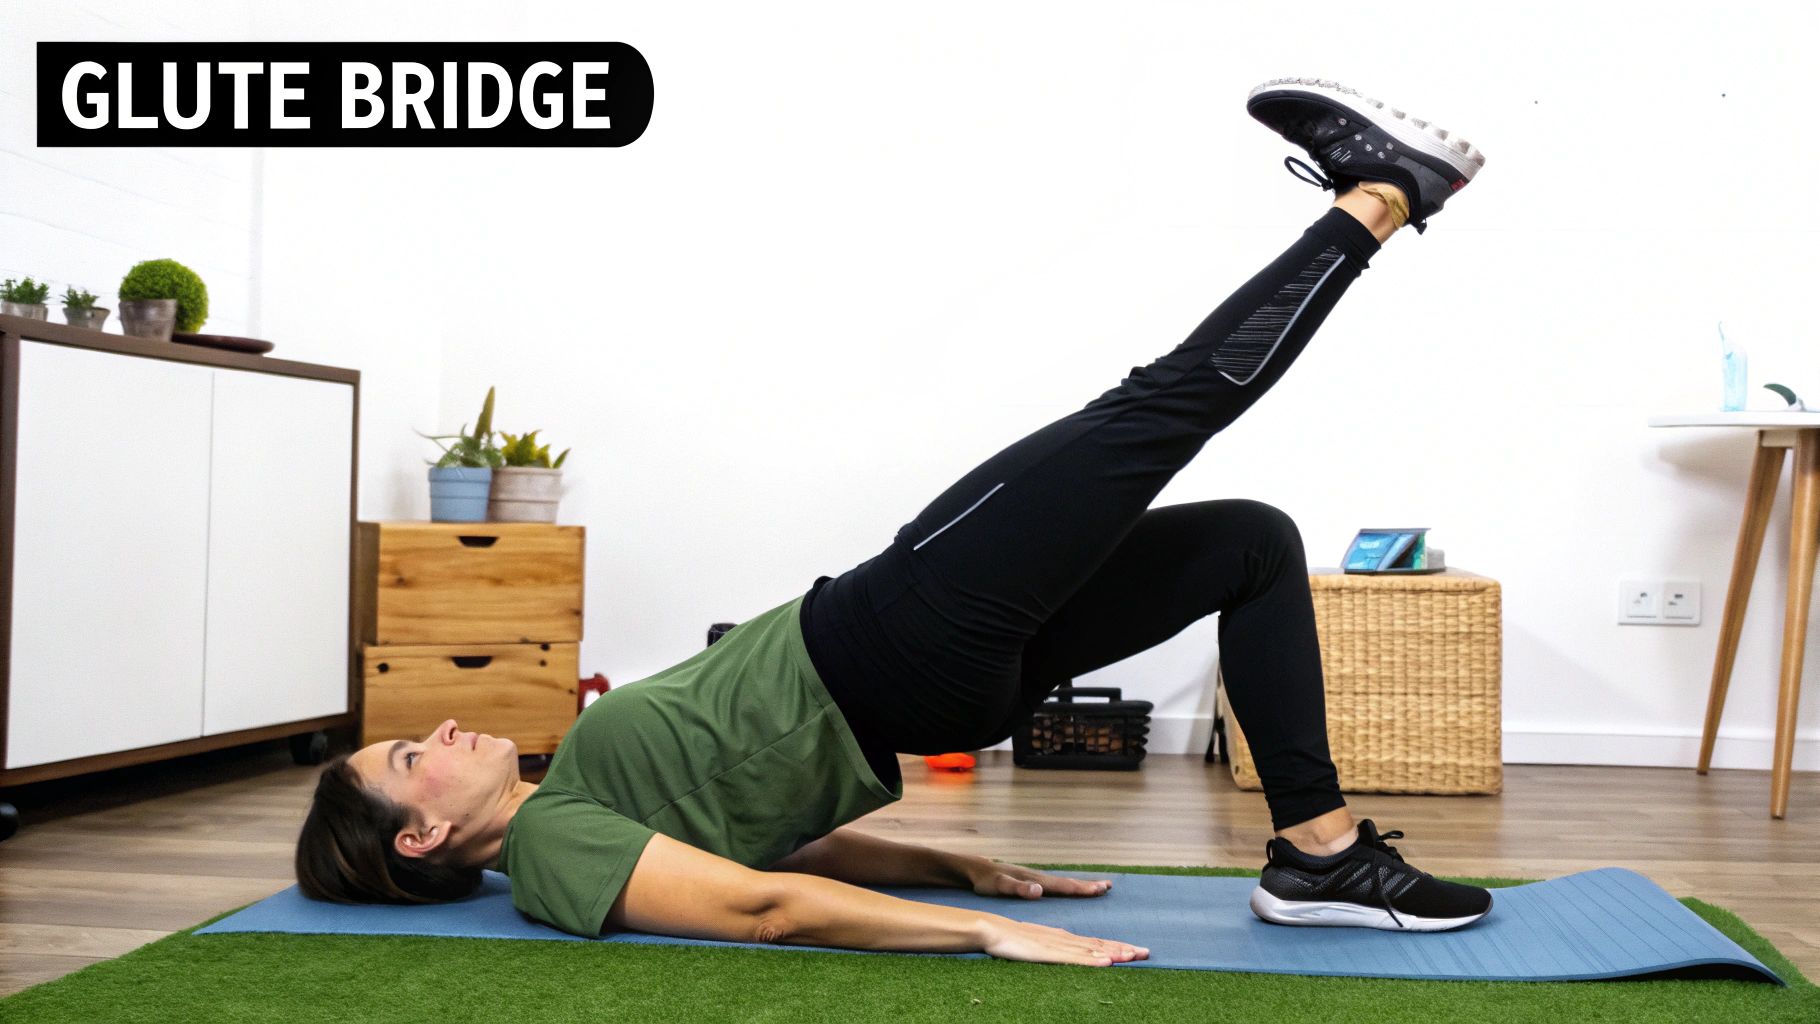
4. Glute Bridge (Strengthening)
The Glute Bridge is a fundamental strengthening exercise that builds the gluteus maximus, the largest muscle in your buttocks. Strong glutes are essential for both preventing and relieving sciatica because they provide crucial support for the pelvis and lower back, promoting proper spinal alignment. This exercise is one of the best for long-term sciatica relief because weak glutes often force smaller muscles like the piriformis to become overactive and tight, leading to sciatic nerve compression.
By strengthening the glutes, you create a more stable pelvic foundation, which takes pressure off the lower back and the sciatic nerve pathway. Many of our patients in San Jose, from desk workers battling sitting-related pain to athletes focused on injury prevention, use Glute Bridges to build the core strength needed to stabilize their chiropractic adjustments and achieve lasting results.
How to Perform the Glute Bridge
Follow these steps carefully to engage the correct muscles and make this one of the most effective exercises for your sciatica relief program:
- Starting Position: Lie on your back with your knees bent and your feet flat on the floor, about hip-width apart. Your heels should be close enough that you can just graze them with your fingertips. Rest your arms by your sides with your palms facing down.
- Engage Your Core: Gently brace your abdominal muscles to stabilize your spine. This prevents your lower back from arching during the movement.
- Lift Your Hips: Press through your heels and squeeze your glutes to lift your hips off the floor until your body forms a straight line from your shoulders to your knees.
- Squeeze and Hold: At the top of the movement, pause for 1-2 seconds and focus on squeezing your glutes as hard as you can.
- Lower with Control: Slowly lower your hips back down to the starting position on the floor.
- Repeat: Aim for 2 sets of 12-15 repetitions. Perform this exercise 2-3 times per week.
Pro-Tip: Focus on the mind-muscle connection. Consciously think about squeezing your glute muscles to initiate the lift rather than using your hamstrings or lower back. This ensures you are strengthening the target area for maximum sciatica relief.
Modifications and Precautions
- Pregnancy-Safe Modification: The standard Glute Bridge is generally safe during pregnancy. However, avoid lying flat on your back for extended periods in the second and third trimesters. Perform the exercise for shorter sets and listen to your body.
- To Increase Difficulty: Place a resistance band around your thighs just above your knees. Press outward against the band as you lift your hips to increase glute activation.
- Contraindications: If you have an acute disc herniation or severe lower back injury, consult with your chiropractor first. Stop immediately if you feel any sharp, shooting pain down your leg or a sudden increase in back pain. A gentle muscle burn is normal, but nerve pain is not.
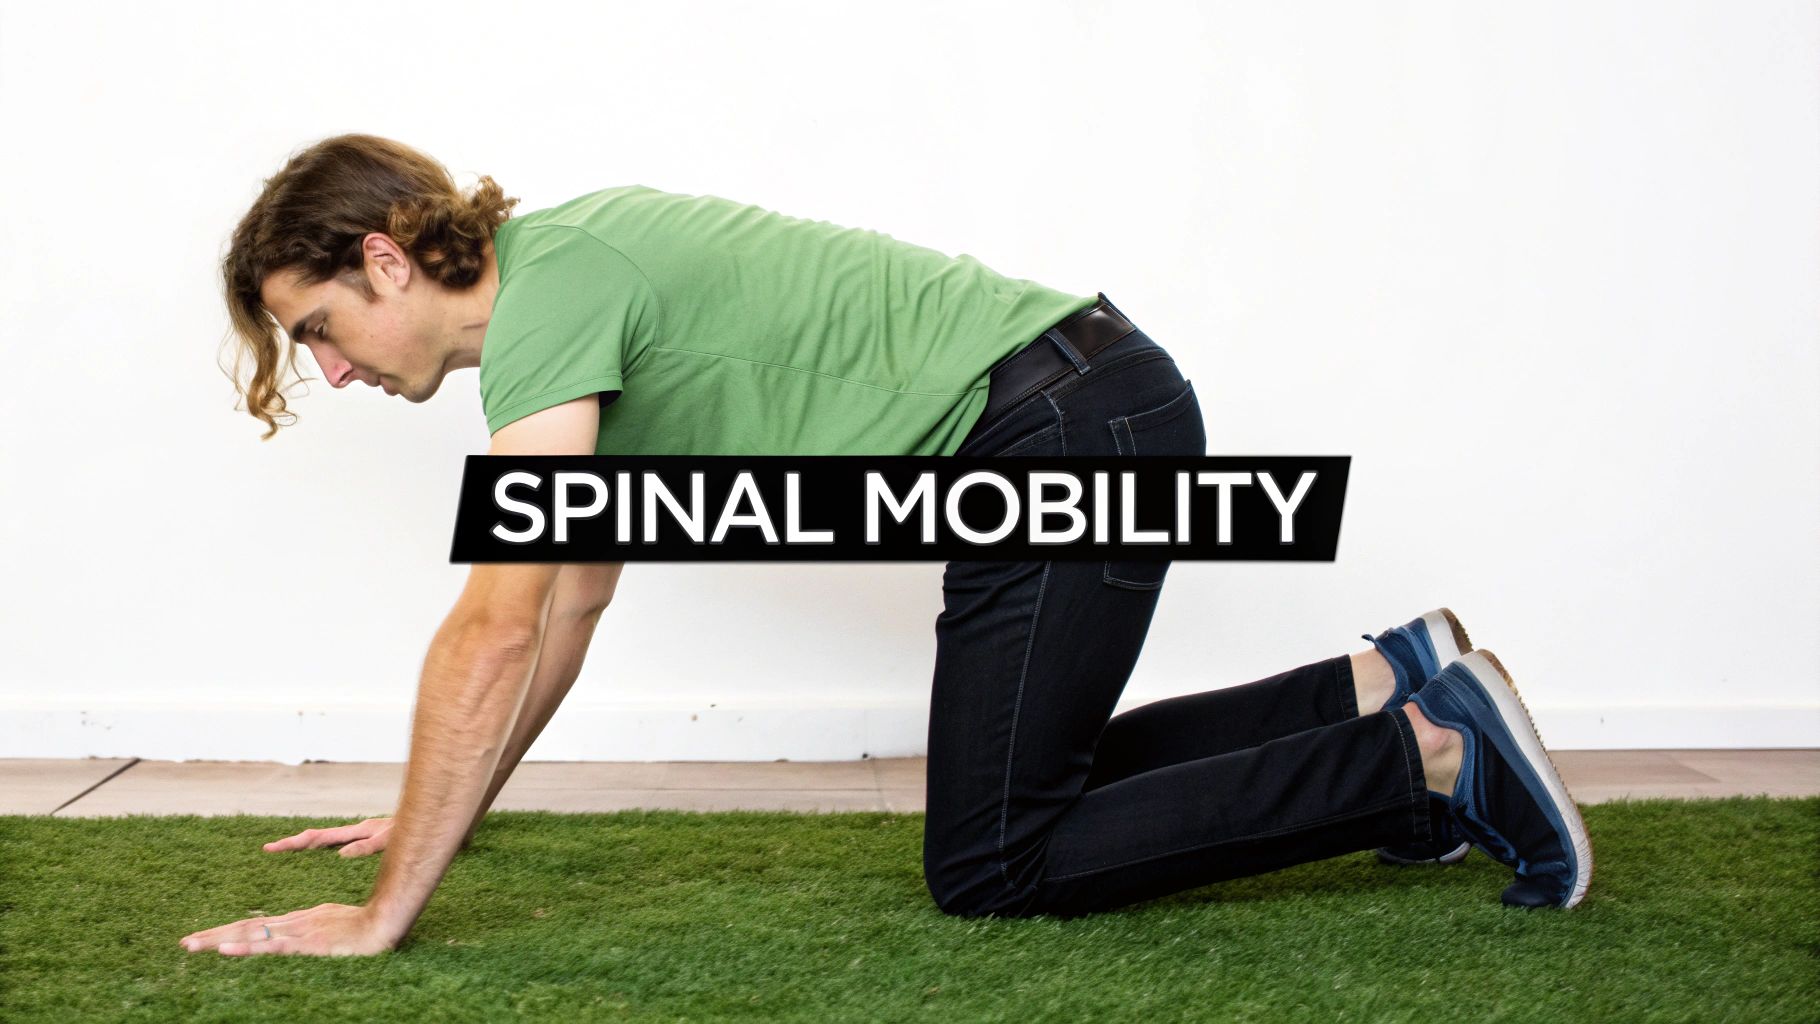
5. Cat-Cow Stretch (Dynamic Spinal Mobility)
Cat-Cow is a gentle, dynamic movement that is exceptionally beneficial for relieving sciatic nerve pain. This fundamental yoga posture involves flowing between two positions that warm up the spine and improve its flexibility. The movement gently mobilizes the vertebral joints, increases circulation to the spinal discs, and reduces tension in the lower back, all of which can alleviate pressure on the sciatic nerve roots. This makes the Cat-Cow stretch one of the best exercises for sciatica relief, particularly for those with stiffness.
The power of this exercise lies in its ability to alternate between spinal flexion (Cat) and extension (Cow). This controlled motion helps to decompress the lumbar spine, create space between the vertebrae, and calm the nervous system. At Resolve Chiropractic in San Jose, we often recommend Cat-Cow as a daily home care routine for our patients, as it safely introduces movement to an irritated area and improves overall spinal health without placing aggressive force on the back.
How to Perform the Cat-Cow Stretch
Follow these steps carefully, synchronizing your breath with the movement to maximize the benefits of this key exercise for sciatica relief:
- Starting Position: Begin on your hands and knees in a tabletop position. Ensure your wrists are directly under your shoulders and your knees are directly under your hips.
- Cow Pose (Inhale): As you inhale, drop your belly toward the floor. Lift your chin and chest, and gaze upward, allowing your tailbone to lift.
- Cat Pose (Exhale): As you exhale, round your spine toward the ceiling. Press firmly into your hands, tuck your chin into your chest, and draw your navel toward your spine.
- Flow with Breath: Continue flowing smoothly between Cat and Cow, linking each movement to an inhale or an exhale.
- Repetitions: Perform this fluid motion for 8-10 full rounds (one round includes one Cat and one Cow). Aim for 1-2 sets.
- Maintain Control: Keep the movements slow and mindful. Focus on articulating each vertebra of the spine rather than rushing through the poses.
Pro-Tip: Make Cat-Cow part of your morning and evening routine. Performing it upon waking can alleviate morning stiffness, while doing it before bed can release the tension accumulated throughout the day.
Modifications and Precautions
- Pregnancy-Safe Modification: Cat-Cow is generally safe during pregnancy and can help relieve back pain. Listen to your body and avoid over-arching the back in Cow pose during later trimesters.
- For Wrist Sensitivity: If you have sensitive wrists, you can perform this exercise on your forearms or by making fists and resting on your knuckles to keep the wrists straight.
- Contraindications: While gentle, you should avoid this stretch if you have a severe, acute disc injury or if the movement causes sharp, radiating pain. If you have any significant spinal conditions, consult with your San Jose chiropractor before performing this exercise.
6. Quadriceps and Hip Flexor Stretch (Standing or Lying)
A dedicated Quadriceps and Hip Flexor Stretch is a crucial exercise for sciatica relief. Tightness in these muscle groups can cause an anterior pelvic tilt, where the pelvis tilts forward. This common postural issue places significant strain on the lumbar spine, compresses the intervertebral discs, and can irritate or pinch the sciatic nerve roots where they exit the spinal column. Addressing this imbalance is foundational to long-term sciatica management.
By actively lengthening the muscles at the front of your hip and thigh, this stretch helps restore a neutral pelvic position. This mechanical correction reduces the excessive curve in the lower back, creating more space for the nerves and alleviating pressure. At Resolve Chiropractic in San Jose, we frequently see patients, especially desk workers, whose sciatica is directly linked to tight hip flexors. This simple stretch is a powerful tool to counteract the effects of prolonged sitting.
How to Perform a Quadriceps and Hip Flexor Stretch
This stretch can be done standing, which is great for a quick break at the office, or lying down for a deeper hold.
- Starting Position (Standing): Stand upright next to a wall or sturdy chair for balance. Keep your feet hip-width apart and engage your core to maintain a neutral spine.
- Position the Leg: Bend your right knee and bring your right foot up toward your right glute. Grasp your right ankle or the top of your foot with your right hand.
- Initiate the Stretch: Gently pull your foot closer to your body. Keep your knees aligned and close together. To deepen the stretch in the hip flexor, slightly tuck your tailbone under and gently push your hips forward.
- Hold and Breathe: You should feel a distinct stretch along the front of your right thigh and hip. Hold this position for 30-45 seconds, breathing steadily. Avoid arching your back.
- Switch Sides: Slowly release your leg and repeat the stretch on your left side.
Pro-Tip: For maximum benefit, perform this stretch every 1-2 hours if you have a desk job. Breaking the cycle of prolonged sitting is one of the most effective ways to prevent hip flexor tightness and the associated sciatic nerve irritation.
Modifications and Precautions
- Pregnancy-Safe Modification: The standing version is generally safe during pregnancy; simply use a wall or chair for solid support. Avoid lying flat on your back for the supine version, especially after the first trimester.
- For Balance Issues: If standing is difficult, perform the stretch lying on your side. Lie on your left side, bend your top (right) knee, and gently pull your right foot back toward your glute.
- Contraindications: Do not perform this stretch if you have an acute knee injury or significant knee pain. If you feel any sharp, pinching, or shooting pain in your hip, back, or knee, stop the stretch immediately.
7. Bird Dog Exercise (Core Stabilization)
The Bird Dog is a fundamental core stabilization exercise renowned for its ability to build strength and endurance in the deep muscles supporting the spine. This exercise targets the abdominal muscles, lower back, hips, and glutes without placing excessive load on the lumbar spine. Its primary benefit for sciatica relief stems from its capacity to enhance core stability, which is crucial for protecting the lower back and reducing strain on the structures surrounding the sciatic nerve.
A weak core often leads to poor posture and movement patterns, which can place undue stress on the lumbar discs and contribute to sciatic nerve irritation. The Bird Dog exercise trains the body to maintain a neutral spine while the limbs are in motion. At Resolve Chiropractic in San Jose, we frequently prescribe the Bird Dog as a primary home stabilization exercise for patients, as it effectively reinforces the spinal alignment achieved through their adjustments.
How to Perform the Bird Dog Exercise
Follow these steps carefully to engage the correct muscles and ensure this becomes one of your best exercises for sciatica relief:
- Starting Position: Begin on all fours in a tabletop position. Your hands should be directly under your shoulders and your knees directly under your hips. Keep your back flat and your head in line with your spine.
- Engage Your Core: Brace your abdominal muscles as if you are about to be lightly punched in the stomach. Maintain this engagement throughout the entire movement.
- Extend Arm and Leg: Slowly and simultaneously extend your right arm straight forward and your left leg straight back. Keep both parallel to the floor.
- Maintain Stability: The key is to keep your torso, hips, and shoulders completely still and level. Avoid arching your back or letting your hip drop.
- Hold and Return: Hold the extended position for 2-3 seconds, focusing on stability. Slowly lower your arm and leg back to the starting position with control.
- Alternate Sides: Repeat the movement on the opposite side, extending your left arm and right leg. This completes one repetition. Aim for 2 sets of 10 reps per side, 3 times per week.
Pro-Tip: Imagine a glass of water balanced on your lower back. Your goal is to move so smoothly and with such control that you wouldn’t spill a single drop. This mental cue helps to keep your hips and shoulders perfectly level.
Modifications and Precautions
- Pregnancy-Safe Modification: The Bird Dog is generally safe during pregnancy. Focus on a smaller range of motion if needed, and avoid overextending the back.
- For Beginners: If extending both an arm and a leg is too challenging, start by extending just one leg at a time. Once you master that, move to extending just one arm at a time.
- Contraindications: If you have a severe, acute disc herniation or significant spinal instability, consult with your chiropractor before starting. Stop immediately if you feel any sharp, shooting pain down your leg or a sudden increase in back pain.
8. Dead Bug Exercise (Core and Spinal Control)
The Dead Bug exercise is a foundational core stabilization movement that is remarkably effective for sciatica relief. It trains the deep core muscles to support and stabilize the lumbar spine without placing compressive force on it. This is crucial for sciatica management, as an unstable core can lead to poor movement patterns and increased irritation of the sciatic nerve. By teaching you to maintain a neutral spine while moving your limbs, the Dead Bug is one of the best exercises for sciatica relief, especially during acute flare-ups.
Its power lies in its ability to build functional core strength in a safe, decompressed position. At Resolve Chiropractic in San Jose, we often prescribe the Dead Bug as a primary exercise during the initial phases of care. It serves as the cornerstone for building the spinal control necessary before progressing to more demanding exercises, ensuring our patients build a strong, resilient foundation for long-term relief.
How to Perform the Dead Bug Exercise
Follow these steps carefully to master the form and get the most out of this powerful exercise for sciatica relief:
- Starting Position: Lie on your back on a comfortable surface. Bend your knees and lift your feet off the floor until your shins are parallel to the ceiling (tabletop position). Extend your arms straight up toward the ceiling.
- Engage Your Core: Gently press your lower back into the floor, engaging your abdominal muscles to eliminate any arch. This connection is critical and must be maintained.
- Controlled Movement: Exhale as you slowly and simultaneously lower your right arm and left leg toward the floor. Only go as low as you can without your lower back arching off the mat.
- Return to Start: Inhale and engage your core to bring your arm and leg back to the starting position with the same slow, controlled motion.
- Alternate Sides: Repeat the movement on the opposite side, lowering your left arm and right leg. This completes one repetition.
- Continue and Breathe: Continue alternating sides for 10-12 repetitions per side. Breathe steadily and avoid holding your breath.
Pro-Tip: For maximum benefit, perform the Dead Bug exercise before your chiropractic adjustment. Activating these deep core muscles helps “wake them up,” allowing your spine to better hold its new alignment after the treatment.
Modifications and Precautions
- Pregnancy-Safe Modification: The Dead Bug is generally safe during the first and second trimesters. In the third trimester, modify by keeping one foot on the floor at all times and focusing only on leg slides or arm movements.
- For Beginners: If lowering both an arm and a leg is too challenging, start by lowering only one leg at a time, then progress to lowering only one arm at a time.
- Contraindications: While this exercise is very safe, stop immediately if you feel any sharp, shooting, or pinching pain in your back or leg. The goal is to feel your abdominal muscles working, not to feel strain in your lower back.
8 Best Sciatica Exercises Compared
| Item | Implementation complexity | Resource requirements | Expected outcomes | Ideal use cases | Key advantages |
|---|---|---|---|---|---|
| Pigeon Pose (Eka Kapotasana) | Moderate–High (requires flexibility & alignment) | Minimal (mat, optional block) | Improved hip mobility; relief for piriformis-related sciatica in 1–2 weeks with consistency | Piriformis syndrome; athletes; post-adjustment stretching | Directly targets piriformis; deep external rotation; modifiable |
| Sciatic Nerve Flossing (Neural Mobilization) | Moderate (precise dynamic movement; practice needed) | Minimal equipment but requires professional instruction initially | Improved neural mobility; reduced numbness/tingling in 2–4 weeks | Nerve irritation, post-injury rehab, recurrent sciatica | Targets sciatic nerve directly; reduces adhesions; evidence-based |
| Prone Hip Internal Rotation Stretch | Low–Moderate (gentler, easy to control) | Minimal (mat, optional pillow) | Isolates deep hip rotators; gentle relief over days–weeks | Those with knee issues or beginners; evening routines | Knee-friendly; controllable intensity; good alternative to pigeon |
| Glute Bridge (Strengthening) | Low (simple movement; form important) | Minimal (mat; optional band/weight) | Increased glute strength and spinal support; prevention in 2–3 weeks | Long-term prevention; desk workers; post-adjustment stabilization | Builds hip extension strength; scalable; improves posture |
| Cat-Cow Stretch (Dynamic Spinal Mobility) | Low (easy flow; needs pacing) | Minimal (mat) | Gentle spinal decompression and mobility; reduces stiffness quickly | Warm-up, daily mobility, acute gentle relief | Safe decompression of lumbar spine; accessible to most |
| Quadriceps & Hip Flexor Stretch (Standing/Supine) | Low (simple technique; balance for standing) | Minimal (none; chair/pillow optional) | Gradual correction of anterior pelvic tilt; reduced lumbar pressure over weeks | Desk workers; posture correction; routine mobility | Addresses mechanical cause (pelvic tilt); quick to perform |
| Bird Dog Exercise (Core Stabilization) | Moderate (coordination and balance) | Minimal (mat) | Improved core stability and proprioception in 3–4 weeks | Long-term stabilization, athletes, injury prevention | Targets deep stabilizers; reduces compensatory tension |
| Dead Bug Exercise (Core & Spinal Control) | Low–Moderate (focus on strict form) | Minimal (mat) | Teaches neutral spine control; safe early recovery outcomes | Early rehab, acute phases, foundational core work | Low-impact; spine remains decompressed; excellent for beginners |
Take the Next Step: Partner with Your San Jose Sciatica Chiropractor for Lasting Relief
Navigating the sharp, radiating pain of sciatica can feel like a lonely and frustrating journey. This guide has equipped you with the best exercises for sciatica relief, designed to mobilize the nerve, stretch tight muscles, and strengthen your core to support your spine. From the deep release of Pigeon Pose to the stabilizing control of the Dead Bug, each movement offers a pathway toward reducing inflammation and reclaiming your mobility here in San Jose.
You’ve learned the importance of proper form, listening to your body, and consistency. These exercises are not just temporary fixes; they are powerful, proactive steps you can take to manage symptoms and prevent future flare-ups.
From Self-Care to Expert-Guided Recovery
While performing these exercises at home is a crucial first step, true and lasting relief requires understanding what’s causing your sciatica in the first place. Is it a bulging disc? Is it a tight piriformis muscle compressing the nerve? Or is it a subtle spinal misalignment in your pelvis? Self-diagnosis can be a guessing game, and performing the wrong exercises for your specific condition could worsen your pain.
This is where professional guidance from a trusted local chiropractor becomes invaluable. Partnering with a skilled chiropractor in San Jose provides the diagnostic clarity and targeted treatment needed to address the root cause of your sciatica, not just the symptoms.
Your Personalized Path to a Pain-Free Life in San Jose
At Resolve Chiropractic, we specialize in helping San Jose residents find definitive answers and lasting solutions for their sciatica. Our approach goes beyond generic recommendations. We conduct a detailed analysis of your spine to identify the exact source of nerve irritation. This allows us to create a personalized care plan that may include precise spinal adjustments and a customized rehabilitative exercise program.
We understand that every patient’s journey is different. Whether you’re an athlete eager to return to your sport, a parent struggling to keep up with your kids, or an office worker seeking relief from pain, we are here to support you. Our goal is to empower you with both expert in-office care and the knowledge to continue your healing at home. Don’t let sciatic pain dictate the terms of your life any longer. Taking control starts with a single, decisive step toward expert care.
Ready to move beyond temporary relief and find a lasting solution for your sciatica? The team at Resolve Chiropractic in San Jose, CA, is here to provide the expert diagnosis and personalized treatment plan you need. Schedule your consultation today at Resolve Chiropractic and start your journey toward a pain-free, active life.